原文链接:http://blog.chinaunix.net/uid-20543183-id-1930812.html
源码文件:./fs/sysfs/
前言
在设备模型中,sysfs文件系统用来表示设备的结构,将设备的层次结构形象的反应到用户空间中。用户空间可以修改sysfs中的文件属性来修改设备的属性值,今天我们就来详细分析一下sysfs的实现。
sysfs的初始化和挂载
sysfs文件系统的初始化是在sysfs_init()中完成的,代码如下:
每个kobject对应sysfs中的一个目录,kobject的每个属性对应sysfs文件系统中的文件。struct sysfs_dirent就是用来做kobject与dentry的互相转换用的,它们的关系如下图所示: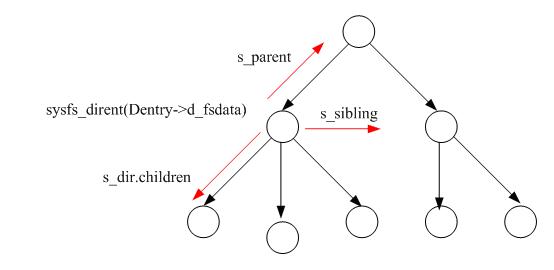
上图表示的是一个kobject的层次结构,dentry的d_fsdata字段指定该结点所表示的sysfs_dirent,sysfs_dirent.s_parent表示它的父kobject,sysfs_dirent.s_sibling表示它的兄弟结点,sysfs_dirent.s_dir.children表示它所属的子节点。
从上图可知,如果要遍历一个结点下面的子结点,只需要找到sysfs_dirent.s_dir.children结点,然后按着子节点的s_sibling域遍历即可。当然,有时候也需要从struct sysfs_dirent导出它所属的dentry结点,我们在代码中遇到的时候再进行分析。
sysfs文件系统的file_system_type定义如下:
通过前面文件系统的相关分析,我们知道在sys_mount()中最终会调用struct file_system_type的get_sb函数来实现文件系统的挂载.它的代码如下:
get_sb_single()的代码在前面已经涉及到,它对super_block以及挂载的dentry和inode的赋值是在回调函数sysfs_fill_super、mnt中完成的.代码如下:
在这里要注意几个全局量. sysfs_sb表示sysfs文件系统的super_block,sysfs_root表示sysfs文件系统根目录的struct sysfs_dirent。sysfs_get_inode(&sysfs_root)用来将sysfs_root导出相应的inode,代码如下:
首先,它以sysfs文件系统的super_block和struct sysfs_dirent的s_ino成员的值做为哈希值到哈希表中寻找相应的inode。如果在哈希表中不存在这个inode,那就新建一个,并将它链入到哈希表.之后,调用sysfs_init_inode()对生成的inode进行初始化.显然.在mount的时候是不会生成inode的.必定会进入sysfs_init_inode()函数.代码如下:
在这里,我们可以看到sysfs文件系统中的各种操作函数了..
在syfs文件系统中,怎么样判断一个目录下是否有这个文件呢?
在前面有关文件系统的分析中我们可以看.有关文件的查找实际上都会由inod->i_op->lookup()函数进行判断.在sysfs中,这个函数对应为sysfs_lookup().代码如下:
由此可见,它的判断会转入到相应的sysfs_dirent中进行判断.如果设备模型在创建目录/文件的时候并不会创建dentry或者inode.只会操作sysfs_dirent结构. 如果找到了这个结构,就为这个结构生成inode,并将其关联到denry中.sysfs_find_dirent()如下:
它用的搜索方法就是我们在之前分析sysfs_dirent结构所讲述的.分析到这里,sysfs的大概轮廓就出现在我们的眼前了.^_^.接下来分析sysfs文件系统中目录的创建过程
在sysfs文件系统中创建目录
在linux设备模型中,每注册一个kobject.就会为之创建一个目录.具体的流程在分析linux设备模型的时候再给出详细的分析.创建目录的接口为: sysfs_create_dir()。代码如下:
在这里,先为结点指定父目录,然后调用create_dir()在父目录下生成结点.代码如下:
在这里,为子节点生成了对应的sysfs_dirent.设置了它的父结点域,并将其链入到父结点的children链表.这样,在文件系统中查找父目录下面的子结点了.
在sysfs中创建一般属性文件
kobject的每一项属性都对应在sysfs文件系统中kobject对应的目录下的一个文件,文件名称与属性名称相同。
创建一般属性的接口为sysfs_create_file(),代码如下:
最终会调用sysfs_add_file(), 参数attr是要生成文件的属性值.
这个流程与创建目录的流程大部份相同.不相同的只是创建目录时,它的父目录为上一层结点,创建文件时,它的父目录就是kobject对应的struct sysfs_dirent.
这样,在kobject对应的目录下面就可以看到这个文件了.^_^
文件建好之后,要怎么样去读写呢? 回忆一下,在sysfs文件系统中,inode的初始化:
sysfs_file_operations的定义如下:
文件的操作全部都在这里了,我们从打开文件说起.sysfs_open_file()代码如下:
在这段代码中,需要注意以下几个操作,
1、buffer链接在file->private_data,buffer还被链接在sysfs_dirent->s_attr.open,这样,VFS通过file,设备模型通过kobject->sd->s_attr.open都能找到这个要操作的 buffer。
2、buffer->ops被设置为了kobject->ktype->sysfs_ops。
文件的写操作入口如下:
首先,调用fill_write_buffer()将用户空间传值下来的数值copy到buffer->page,然后再调用flush_write_buffer()与设备模型进行交互。flush_wirte_buffer()代码如下:
我们在分析open()操作的时候曾分析到,buffer的ops是kobject->ktype->ops.在这里,它相当于调用了kobject->ktype->ops->store().参数分别为:操作的kobject,文件对应的属性,写入的值和值的长度。
Sysfs这样设计,主要是在VFS保持一个统一的接口,因为每一个kobject对应的属性值都不相同,相应的,操作方法也不一样,这样,在ktype中就区别开来了.
文件的读操作相应接口为sysfs_read_file(),代码如下:
读操作的流程刚好和写操作流程相反.它先从设备模型中取值,然后再copy到用户空间.fill_read_buffer的代码如下:
在这里,我们看到,最终会调用kobject->ktype->ops->show()方法.参数含义同写操作中是一样的.
在sysfs中创建二进制属性文件
二制制属性通常用于firmware中,它用来更新firmware的固件。
它的接口为sysfs_create_bin_file(),代码如下:
sysfs_add_file()这个函数我们在之前已经分析过,在这个地方,可能会引起迷糊,因为在sysfs_add_file()中有:
这里为什么是sd->s_attr呢? 应该是sd-> s_bin_attr才对吧!
仔细观察struct sysfs_dirent的结构,如下:
注意中间是一个union结构,实际上只占用一个内存空间,而且s_attr与s_bin_attr的第一个属性都为struct attribute,所以在这里,sd->s_attr与sd-> s_bin_attr;的效果是一样的。内核这样处理,又少用了一个接口。看来作者在设计的时候,花了很多的心思.
二进制的文件读写与普通属性的文件读写方式大部份都一样,所不同的是,二进制文件的读写接口分别是:sysfs_dirent->s_bin_attr.bin_attr->read和sysfs_dirent->s_bin_attr.bin_attr->write。
sysfs文件系统中的链接文件
创建链接文件的接口为:sysfs_create_link().代码如下:
上面的操作大部份都与普通文件的创建相似,所不同的只是下面这段代码的区别:
就是在sd->s_symlink.target_sd保存到链接目的地的sysfs_dirent.
符号链接的操作如下所示:
在通过符号链接查找文件的时候,在VFS中会调用inod->i_op->readlink()进行操作.它的代码如下:
它的操作和其它文件系统一样,都是通用follow_link()取得目的地的路径,然后保存到nd->saved_names[]中,然后,调用vfs_readlink()将目标路径copy到buffer中.接着,调用put_link进行事后处理工作.
follow_link()的操作如下示:
nd_set_link()是将page中的值copy到nd->saved_name[]中.sysfs_getlink()的代码如下:
sysfs_get_target_path()代码如下:
这段代码的逻辑比较简单.它先是找到目标路径和当前路径相同的父结点,然后再沿着目标结点往相同的父结点向上走,将路径依次从缓存区后面往前面保存.
例如: /sys/eric/kernel/test链接到了/sys/sys/device.
它先找到两个路径共有的父结点/sys此时缓存区为:/sys然后,沿着/sys/sys/device往/sys移动,路径加从缓存区的后面往前面加.依次为:
1: /sys/ /device
2:/sys/sys/device
这样就找到了目的地的路径. ^_^.
后面sysfs_put_link()的操作就不再讲述了,它只是释放掉缓存区.
小结
在本小节里,我们深入探讨了sysfs文件系统的实现机理.这对于我们理解linux设备模型是很有帮助的.