在linux内核中,有一种通用的双向循环链表,构成了各种队列的基础。链表的结构定义和相关函数均在include/linux/list.h中。
在阅读list.h文件之前,有一点必须注意:linux内核中的链表使用方法和一般数据结构中定义的链表是有所不同的。
一般的双向链表一般是如下的结构,
- 有个单独的头结点(
head) - 每个节点(
node)除了包含必要的数据之外,还有2个指针(pre,next) pre指针指向前一个节点(node),next指针指向后一个节点(node)- 头结点(
head)的pre指针指向链表的最后一个节点 - 最后一个节点的
next指针指向头结点(head)
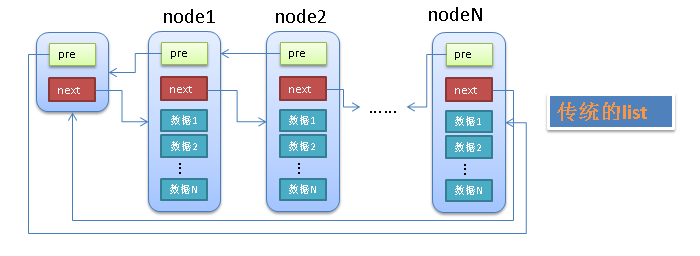
传统的链表有个最大的缺点就是不好共通化,因为每个node中的data1,data2等等都是不确定的(无论是个数还是类型)。
linux中的链表巧妙的解决了这个问题,linux的链表不是将用户数据保存(嵌入)在链表节点中,而是将链表节点保存(嵌入)在用户数据中。
linux的链表节点只有2个指针(pre和next),这样的话,链表的节点将独立于用户数据之外,便于实现链表的共同操作。
具体见下图: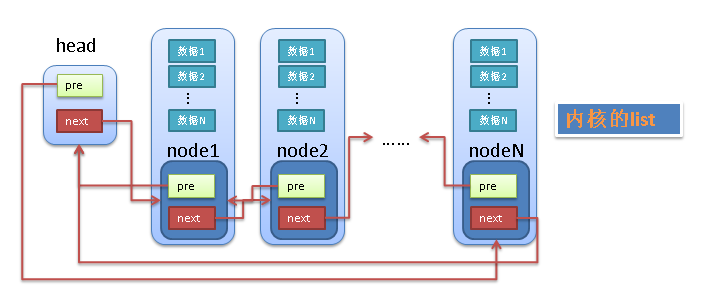
linux链表中的最大问题是怎样通过链表的节点来取得用户数据?
和传统的链表不同,linux的链表节点(node)中没有包含用户的用户data1,data2等。
下面就来全面的介绍这一链表的各种API。
声明和初始化
|
|
这是链表的元素结构。因为是循环链表,表头和节点都是这一结构。有prev和next两个指针域,分别指向链表中前一节点和后一节点。
|
|
初始化链表,链表头的prev和next都指向自身。
链表修改
插入
双向循环链表的实现,很少有例外情况,基本都可以用公共的方式来处理。这里无论是加第一个节点,还是其它的节点,使用的方法都一样。
另外,链表API实现时大致都是分为两层:一层外部的,如list_add、list_add_tail,用来消除一些例外情况,调用内部实现;一层是内部的,函数名前会加双下划线,如__list_add,往往是几个操作公共的部分,或者排除例外后的实现。
删除
list_del是链表中节点的删除。之所以在调用__list_del后又把被删除元素的next、prev指向特殊的LIST_POSITION1和LIST_POSITION2,是为了调试未定义的指针。
list_del_init则是删除节点后,随即把节点中指针再次初始化,这种删除方式更为实用。
替换
list_replace是将链表中一个节点old,替换为另一个节点new。从实现来看,即使old所在地链表只有old一个节点,new也可以成功替换,这就是双向循环链表可怕的通用之处。
list_replace_init将被替换的old随即又初始化。
搬移
list_move的作用是把list节点从原链表中去除,并加入新的链表head中。
list_move_tail只在加入新链表时与list_move有所不同,list_move是加到head之后的链表头部,而list_move_tail是加到head之前的链表尾部。
拆分
list_cut_position用于把head链表分为两个部分。head链表中的head->next一直到entry(包括entry)被删除,并加入到新链表list的头部。新链表list应该是空的,或者原来的节点都可以被忽略掉。可以看到,list_cut_position中排除了一些意外情况,保证调用__list_cut_position时至少有一个元素会被加入到新链表list。
合并
list_splice的功能和list_cut_position正相反,它合并两个链表。list_splice把list链表中的节点加入head链表中。在实际操作之前,要先判断list链表是否为空。它保证调用__list_splice时list链表中至少有一个节点可以被合并到head链表中。
list_splice_tail只是在合并链表时插入的位置不同。list_splice是把原来list链表中的节点全加到head链表的头部,而list_splice_tail则是把原来list链表中的节点全加到head链表的尾部。
list_splice_init除了完成list_splice的功能,还把变空了的list链表头重新初始化。
list_splice_tail_init除了完成list_splice_tail的功能,还把变空了得list链表头重新初始化。
list操作的API大致如以上所列,包括链表节点添加与删除、节点从一个链表转移到另一个链表、链表中一个节点被替换为另一个节点、链表的合并与拆分、查看链表当前是否为空或者只有一个节点。
链表判断
表尾
list_is_last判断list是否处于head链表的尾部。
空链表
list_empty判断head链表是否为空,为空的意思就是只有一个链表头head。
list_empty_careful同样是判断head链表是否为空,只是检查更为严格。
单节点
list_is_singular判断head中是否只有一个节点,即除链表头head外只有一个节点。
链表遍历
遍历是链表最经常的操作之一,为了方便核心应用遍历链表,Linux链表将遍历操作抽象成几个宏。在介绍遍历宏之前,我们先看看如何从链表中访问到我们真正需要的数据项。
list_entry
我们知道,Linux 链表中仅保存了数据项结构中 list_head 成员变量的地址,那么我们如何通过这个list_head成员访问到作为它的所有者的节点数据呢? Linux 为此提供了一个list_entry(ptr,type,member)宏,其中ptr是指向该数据中list_head成员的指针,也就是存储在链表中的地址值,type是数据项的类型,member则是数据项类型定义中list_head成员的变量名,例如,我们要访问nf_sockopts链表中首个nf_sockopt_ops变量,则如此调用:
这里list正是nf_sockopt_ops结构中定义的用于链表操作的节点成员变量名。
list_entry的使用相当简单,相比之下,它的实现则有一些难懂:
container_of宏定义在[include/linux/kernel.h]中:
offsetof宏定义在[include/linux/stddef.h]中:
size_t最终定义为unsigned int(注:i386平台)。
这里使用的是一个利用编译器技术的小技巧,即先求得结构成员在与结构中的偏移量,然后根据成员变量的地址反过来得出属主结构变量的地址。
container_of()和offsetof()并不仅用于链表操作,这里最有趣的地方是((type *)0)->member,它将0地址强制”转换”为type结构的指针,再访问到type结构中的member成员。在container_of宏中,它用来给typeof()提供参数(typeof()是gcc的扩展,和sizeof()类似 ),以获member成员的数据类型;在offsetof()中,这个member成员的地址实际上就是type 数据结构中member成员相对于结构变量的偏移量。
如果这么说还不好理解的话,不妨看看下面这张图:offsetof()宏的原理
对于给定一个结构,offsetof(type,member)是一个常量,list_entry()正是利用这个不变的偏移量来求得链表数据项的变量地址。
list_first_entry是将ptr看完一个链表的链表头,取出其中第一个节点对应的结构地址。使用list_first_entry是应保证链表中至少有一个节点。
list_for_each
list_for_each循环遍历链表中的每个节点,从链表头部的第一个节点,一直到链表尾部。中间的prefetch是为了利用平台特性加速链表遍历,在某些平台下定义为空,可以忽略。
__list_for_each与list_for_each没什么不同,只是少了prefetch的内容,实现上更为简单易懂。
list_for_each_prev与list_for_each的遍历顺序相反,从链表尾逆向遍历到链表头。
list_for_each_safe
list_for_each_safe也是链表顺序遍历,只是更加安全。即使在遍历过程中,当前节点从链表中删除,也不会影响链表的遍历。参数上需要加一个暂存的链表节点指针n。
list_for_each_prev_safe与list_for_each_prev同样是链表逆序遍历,只是加了链表节点删除保护。
list_for_each_entry
list_for_each_entry是遍历链表节点,而是遍历链表节点所有者的数据结构。这个实现上较为复杂,但可以等价于 list_for_each 加上 list_entry 的组合。
list_for_each_entry_reverse是逆序遍历链表节点所有者的数据结构,等价于 list_for_each_prev加上list_etnry的组合。
list_for_each_entry_continue也是遍历链表上的节点所有者的数据结构。只是并非从链表头开始,而是从结构指针的下一个结构开始,一直到链表尾部。
list_for_each_entry_continue_reverse是逆序遍历链表上的节点所有者的数据结构。只是并非从链表尾开始,而是从结构指针的前一个结构开始,一直到链表头部。
list_for_each_entry_from是从当前结构指针pos开始,顺序遍历链表上的结构指针。
list_for_each_entry_safe
list_for_each_entry_safe也是顺序遍历链表上节点所有者的数据结构。只是加了删除节点的保护。
list_for_each_entry_safe_continue是从pos的下一个结构指针开始,顺序遍历链表上的结构指针,同时加了节点删除保护。
list_for_each_entry_safe_from是从pos开始,顺序遍历链表上的结构指针,同时加了节点删除保护。
list_for_each_entry_safe_reverse是从pos的前一个结构指针开始,逆序遍历链表上的结构指针,同时加了节点删除保护。
至此为止,我们介绍了linux中双向循环链表的结构、所有的操作函数和遍历宏定义。相信以后在linux代码中遇到链表的使用,不会再陌生。
参考原文
linux内核部件分析(一)——连通世界的list
深入分析 Linux 内核链表
《Linux内核设计与实现》读书笔记(六)- 内核数据结构